36 Hours of OS X “Lion”: A Review
So OS X “Lion” is out now for over 36 hours. It’s time for a review of the minor troubles and glitches I had with it so far.
Table of Contents
Preparation: Make a Backup! Apps: Rosetta is gone
Preparation: Check the File System!
Preparation: Application Compatibility
Preparation: Download OS X Lion and burn a DVD from it immediately
After the Upgrade: Some things are quiet different
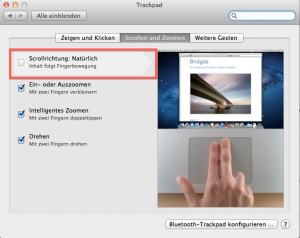
UI: natural scrolling
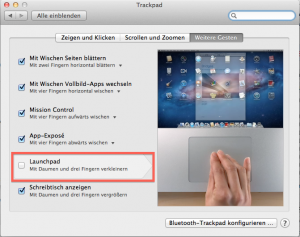
UI: Launchpad
UI: Make Dashboard and Mission Control behave
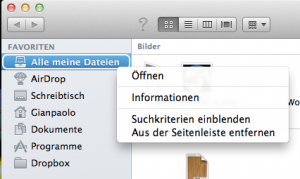
Finder: Where’s my Library and Status bar? Get rid of that annoying “All My Files” item
Kernel Extension: Serial-to-USB driver
Cisco VPN client
Upgrade the NAS Software for AFP compatibilityPreparation: Make a Backup!
Just a warning note to everyone intending to upgrade to Lion: Even if you NEVER take backups — at least for this time, take a backup using Time Machine.
So far I can not stress this enough: Make a backup! Really!
I know, there’s lot’s of people not taking backups. Believe me: Upgrading the Operating System is a major action than can be cumbersome and very well impose issues on your Mac during that process.
In my case for example, the upgrade completely screwed my hard drive. While in the first place everything seemed to work fine during the upgrade and the first reboot, my Mac got stuck during the second reboot. After seeing the ‘spinning wheel’ for minutes I decided to reboot into verbose mode. Verbose mode is enabled if you press CMD+V during system startup. This will cause Mac OS X to display the kernel boot messages on-screen instead of the Apple logo.
So I ended up in verbose mode giving me the message “Still waiting for root device” repeatedly.
So I rebootet the system with a bootable Snow Leopard as well as a bootable Lion DVD and headed straight to Disk Utility. Unfortunately, both systems refused to check and repair the partition on the hard drive, leaving me with some obscure unrecoverable logical errors within the file system.
I don’t know the reason for this behaviour at all. But in the end, I can only conclude: Be on the safe side and take a backup BEFORE attempting to upgrade.
It did it (I do regurlarly anyway) and was very happy about this, as Time Machine saved me a lot of time and hassles.
A collegue of mine at the office encountered the very same issue on his MBP as me, so I doubt it’s a pure coincidence. It can well be bug within the OS X Lion installer or just the shortcomings of having an unclean file system on the Mac itself.
Preparation: Check the File System!
This leads to another preparation step: check the file system before upgrading. After my experience it would definitely not hurt booting the system from the Snow Leopard DVD and check (and repair) the file system from Disk Utility.
But again: Take the backup FIRST 😉
Preparation: Application Compatibility
RoaringApps has an extensive list of applications listed with their current compatibility status on OS X Lion. You’re better off checking in there and download current versions of your applications. If you use applications that require kernel extensions or drivers (I had a serial-to-USB dongle with a kernel driver, VirtualBox and Wireshark installed), then I’d recommend to upgrade to the current version before installing Lion.
That should prevent issues with broken kernel extensions in the first place.
Again: I’d do this only after taking the backup first …
Preparation: Download OS X Lion and burn a DVD from it immediately
Oh well. Apple distributes Lion exclusively through App Store. You cannot buy any physical media from it. That may be a good thing for the environment. But in terms of recovery (especially if somethings goes wrong, as it did with me), you should have the DVD at hand.
Save yourself some time and burn a DVD before you start the upgrade. You’ll find a tutorial over there at OSXDaily.
Another way would be to store Lion to a bootable USB stick, see again on OSXDaily.
Two reasons, why you should make a DVD or bootable USB stick before the upgrade:
- After you downloaded OS X Lion, you’ll end a with a file called “Install OS X Lion” in your application folder.
If you just run the installation from there, that file WILL GET DELETED after installing Lion. So you cannot burn the DVD afterwards unless you download the complete package once again! - If something goes wrong during the install, it’s a good thing to have a bootable DVD/stick at hand for recovery.
At this point, you’re now fully preopared and ready to upgrade to OS X Lion without fear. Go and hit the button and welcome OS X Lion in 30 minutes (or less)…
After the Upgrade: Some things are quiet different
I admit that I only read about OS X Lion, I never had a beta version at hands. So when Lion finally came up, I found myself in a shiny new world.
But, as with every new OS, some things are quiet different and may be distorting and need some further review to fix. Here’s the things I came along.
UI: natural scrolling
OS X implements new gestures for controlling the UI. Some of them are quiet useful, while others aren’t. That surely is more a matter of personal preference.
The only things I disabled was the so called “natural scrolling”. While the “content follows gesture”-approach works well on the iPhone and iPad, it seems very uncomfortable to me on the Mac. Maybe I’m just old school 😉
UI: Launchpad
In short: What do I need this for on the Mac?
To be honest: For launching an App, I just enter it’s name in Spotlight and go for it – it’s a thousand times faster than fiddling through 3 pages of Apps in launchpad.
And for the most important Apps, they have their place in the Dock anyway.
So I turned both the gesture and active corner off for Launchpad.
UI: Make Dashboard and Mission Control behave
Mission Control takes over from Exposé and Spaces. Two things I changed there:
- I changed Dashboard to NOT display as a separate space. I use the Dashboard mostly for quick-access to calculator, calendar and converter widgets. I don’t see why I should swithc spaces if I can have the widgets shown on top of my current space.
- I also changed the auto-arrange feature of Mission Control work spaces
Finder: Where’s my Library and Status bar? Get rid of that annoying “All My Files” item
Oh well, that annoying “All My Files” item on the left-hand view in Finder reminds me so much of Windows 😉
Sorry guys, I keep order with my folders and files, and that feature is more annoying than helpful to me. Luckily enough this can be easily removed from the sidebar.
From Finder’s properties you may as well set your own starting location for Finder. By default it’s set to ‘All my Files’ which I changed to my personal home directory.
Another thing quiet as annoying as in Windows is the status bar being hidden by default. Maybe that’s something the average user doesn’t need. I do!
Again, the status bar can still be enabled through the menu.
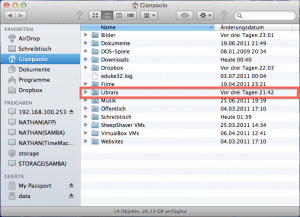
Yet another thing that I don’t like: Lion hides some folders away from the User’s view. I didn’t like this with Windows either!
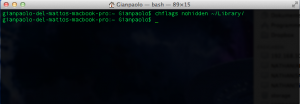
If you miss the “Library” or other folders when you open your home folder in Finder, then you must enable their display through Terminal.
Open a Terminal and run this command from there:
chflags nohidden ~/Library
(To make the Tilde (~) character, just press ALT+n).
Apps: Rosetta is gone
Well, if you downloaded and upgraded all Apps, you won’t miss Rosetta, the PowerPC emulator included with previous versions of OS X.
I just missed one application, the ZTerm terminal emulator, which had just received a Lion-upgrade as well.
Kernel Extension: Serial-to-USB driver
I use a Serial-to-USB dongle for remote management of Cisco devices.
As it turned out, my own article about the Aten USB driver for Snow Leopard holds true for OS X Lion as well 😀
Cisco VPN client
Oh well, the Cisco VPN client for OS X does not work any longer on Lion – at least not when running the OS in 64-bit mode, which is now default. If you start Lion in 32-bit mode, then the Cisco VPN client still works.
How to start Lion in 32-bit mode? Press and hold keys 3+2 during startup to load the 32-bit kernel. Another option is to set the the kernel mode through a unix command in Terminal.
I wrote about this already in the context of VirtualBox before, but the same procedure applies to this as well.
Upgrade the NAS Software for AFP compatibility
I have a QNAP TS-459 Pro II Turbo NAS. Most NAS devices, including this one, require an uprade if you use AFP (Apple Filing Protocol) to access it from OS X because of lack of the AFP DHX2 authentication feature.
Current firmware 3.5.0, released mid of August 2011, fixes this issue and TimeMachine backup to the NAS works again flawlessly.
That’s if for my experiences on OS X Lion so far. After all, it’s not too bad at all 😉

