|
This page was exported from phaq
[ http://phaq.phunsites.net ] Export date: Thu Apr 25 2:18:09 2024 / +0000 GMT |
|
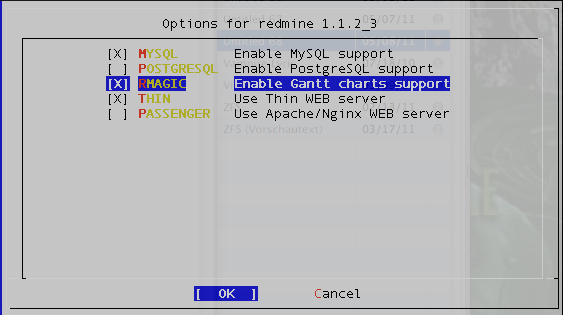
"Redmine is a flexible project management web application. Written using Ruby on Rails framework, it is cross-platform and cross-database." (redmine.org) Here's my short primer on setting up Redmine on FreeBSD. In my case, I just wanted a rather simplistic and stripped-down environment, which was the reason to choose Redmine. While it can perfectly integrate with Apache, Nginx and other web-servers, I preferred to use the minimalistic "thin" web-server. I do as well use self-compiled port in favor to binary packages. Feel free to use binary packages if you like ;-) Installing the softwareRedmine requires a database server. Either MySQL or PostgreSQL or sqlite. If chose to use MySQL and installed it from the ports using defaults: Then install Redmine from /usr/ports/www/redmine. It's important to fire up the "config dialog" to include the "thin" web-server: Enable service configurationEnable the services in your /etc/rc.conf. I choose to enable SSL in the configuration above. If you don't need SSL, then change the "redmine_flags" line to read as follows: Prepare MySQLNow start mysql server: Fire up the mysql console. If this happens to be the first time you use MySQL, then you won't have a password yet. It may be a good idea then, to first assign new passwords and remove the default database stuff. Do this Now create the database and user for use with Redmine: Prepare RedmineFor Redmine you'll need to edit some configuration files at /usr/local/www/redmine/config first. First copy the "database.yml.example" file to "database.yml". Now edit the "database.yml" file to your correct database settings:
Now create the session store and import the initial database as follows: To enable mail processing, you need to copy "email.yml.example" to "email.yml": Then edit "email.yml" to your proper email settings. The following example is for SMTP delivery through an external host:
Optional: Enable SSL modeI enabled SSL for the "thin" web-server in /etc/rc.conf. If you choose to not use SSL, skip this step. To enable SSL, you need to create the SSL private key and a certificate. I'm giving just the command list here, as this procedure is otherwise very well documented over there at the mod_ssl FAQ. The above procedure would essentially create a password-protected key (step 1), which would then get the password removed (step 2). I'd then create a signing request in the 3rd step and have a self-signed certificate created (last command). The removal of the password is essential to start the web-server without prompting for a password. Now, there was just one little cave-at I came along. On my setup, Redmine would not properly run in SSL mode in some cases create redirect url containing http:// instead of https://. I suspect this is a problem caused by the "thin" web-server, which would not properly state that it runs in SSL mode to the application. Obviously, wenn running "thin" in SSL mode, it would no longer word in "http plain" mode, so this causes some errors. For example, when logging on to your host using https://HOSTNAME:3000, you'd get redirected to http://HOSTNAME:3000/login?back_url=http://HOSTNAME:3000". Now, as this obviously won't work, there's a little change required in the "/usr/local/www/redmine/vendor/rails/actionpack/lib/action_controller/request.rb" file. Look out for this text block:
Then change it to look like this:
This will force Redmine into thinking it's permanently SSL enabled, thus it will always generate proper https:// URLs. This particular issue would propably not come up when using Apache or Nginx in SSL forwarding mode. Start using RedmineNow you're basically done. Start accessing Redmine through https://YOURHOSTNAME:3000 (or http://YOURHOSTNAME:3000, in case you left SSL disabled). And don't forget to change your default username/password settings upon first login. I recommed the Redmine User's Guide for further reading ;-) |
| Powered by [ Universal Post Manager ] plugin. HTML saving format developed by gVectors Team www.gVectors.com |