Sharing Windows 7 between Boot Camp and VirtualBox
I always used to have Windows installed through Boot Camp on my MacBook Pro. The reason for it being simple: I need it for some games 😉
On the other hand, I use OS X for my primary work, but again, sometimes there’s no way around Windows. So I had the same Windows installed again within VirtualBox.
Well, what a waste of valuable disk space. So, after I got my new MacBook Pro, equipped with an SSD, I decided to go for it and share the Boot Camp partition between Windows 7 running natively and VirtualBox.
Actually, there exist a lot of posts on this topic already. So here’s a few I came across:
- Windows 7 on Mac OS X through Virtual Box
- Windows 7 Bootcamp Installation mit Virtual Box nutzen (in german)
- Windows7 in OSX with Bootcamp and Virtualbox
- How to run Windows 7 under Mac OS X 10.6 for free
The best and most complete one is IMHO luckypiplav’s howto, as it already covers most of the issues and caveats.
So my today’s post will be sort of an aggregate of all these posts before. I’m not trying to duplicate, my focus is to show what I had to do to get my setup working for me.
To begin with, here’s a short summary of my specs:
- Apple MacBook Pro 15″, February 2011 model, equipped with an 120 GiB SSD instead of a 500 GiB hard drive
- OS X 10.6.6 on HFS partition (80 GiB)
- Windows 7 SP 1 on Boot Camp partition (40 GiB)
Install Windows 7 through Boot Camp
I’m not going to loose big words on this. I used the Boot Camp assistant to prepare the hard drive for installation.
My hard drive was split into a 80 GiB partition for OS X and a 40 GiB partition for Windows 7.
The process is straight forward. For those not so familiar with it, here’s a howto.
After completing Windows 7 setup I first installed SP1 and all additional updates. I also activated the Windows 7 license. Then I booted right back into OS X.
Setup RAW partition access
Oh well, here’s some tech stuff to go through. This is also one of the things I dislike about all the other posts on this topic (sorry guys, I’m just honest): Everyone tells you to do some shell magic trickery, like write access to the partition device files. However, if your setup is only slightly different, you’re most likely doomed 😉
So, let’s start on looking up the partition information first. For this you need to launch Disk Utility first.
My screen shots are from a german language OS X, but for the sake of demonstration purpose, this will be sufficient.
On the main window, click your Boot Camp partition first and the “Information” icon second.
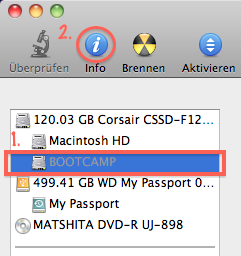
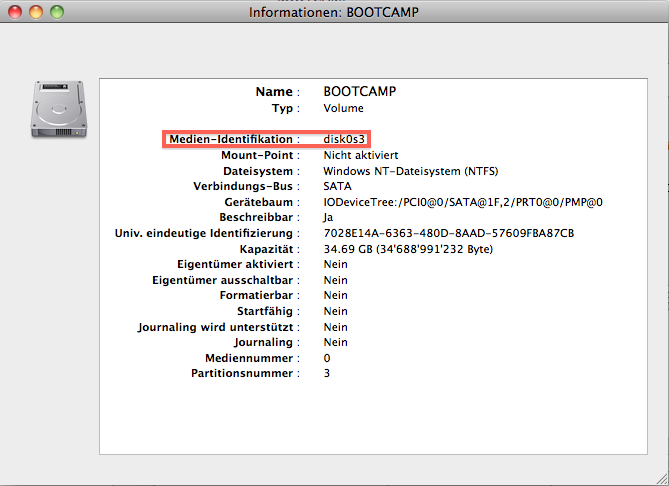
This will reveal the partition information. The most important thing for us to work with, is the partition ID, which in my case reads “disk0s3” (first disk, 3rd slice). In most cases this will be identical for you, but chances are, that it’s not. If it reads something different for you, then use this instead.
Now open up Terminal. Your starting directory in Terminal is usually your home directory, which evaluates to /Users/USERNAME. In my case it’s /Users/Gianpaolo. You can always verify your current location using the “pwd” (Print Working Directory) command.
I store all my VM related stuff in my home directory in a folder called “VirtualBox VMs”, so I change to this directory and create a new folder for the new Windows 7 VM.
cd "VirtualBox VMs"

mkdir Win7onMBP

cd Win7onMBP
Now, we need to grant permissions to the partition we inspected before. Rembember, mine was “disk0s3”? Don’t forget to use the one, that correctly applies to your system.
Note: You’ll be asked to enter your password to run this command:
sudo chmod 777 /dev/disk0s3
You will also need to eject the Boot Camp volume, in case it’s mounted.
Note: If you decided to format your Boot Camp partition with NTFS, then it won’t be accessible from OS X. In this case, it won’t be mounted as well. This is the case for me, so I effectively left this step out.
diskutil umount /Volumes/BOOTCAMP
To have this settings parmenently applied to the system, you will need to add them to the local boot script. For this purpose, we use the “nano” command, a simple text editor which is simpler to use then “vi”. Just type and quit using the “CTRL-X” key stroke.
Chances are that this file does not yet exist, but never mind, it’ll be created automatically.
sudo nano /etc/rc.local
Add the following text to your rc.local file:
# grant VirtualBox permissions to Boot Camp partition

#

chmod 777 /dev/disk0s3

diskutil umount /Volumes/BOOTCAMP
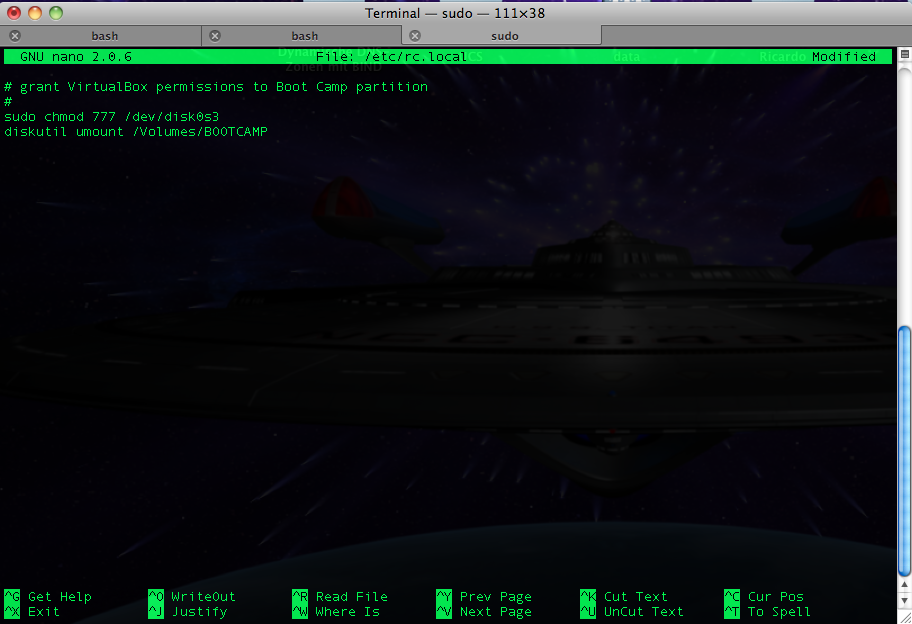
Again, if the Boot Camp volume is NTFS formatted, it won’t be mounted anyway, so the “diskutil” line can be omitted in this case.
Type “CTRL-X” to save and exit.
Now it’s time to create the RAW disk file for use with VirtualBox. For this, you should be inside the VM directory we created previously. If in doubt, check this using the “pwd” command. From here, run the following command:
sudo VBoxManage internalcommands createrawvmdk -rawdisk /dev/disk0 -filename win7raw.vmdk -partitions 3
Please note that this time, you won’t need to give the whole “disk0s3” string to the command above. Instead leave the last two characters away, just stating the physical disk name, which is “disk0”. You will need however to supply the partition number “3” taken from the “disk0s3” string to the “-partitions” argument as seen above.
Create the VM
Simply follow the instructions of luckyviplav’s howto.
Important to note however: As of VirtualBox 4.x, the disk drives are always attached to a SATA controlled, as shown on the screenshot below.
It is effectively required to remove the disk from the SATA controller and attach it to the IDE controller as primary master instead. Also do not forget to set the IDE controller type to “ICH6”, otherwise you’ll get a “STOP: 0x0000007B” BSOD (Inaccessible Boot Device)”.
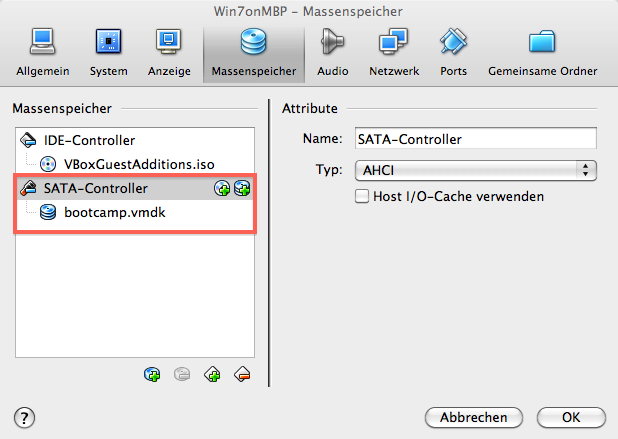
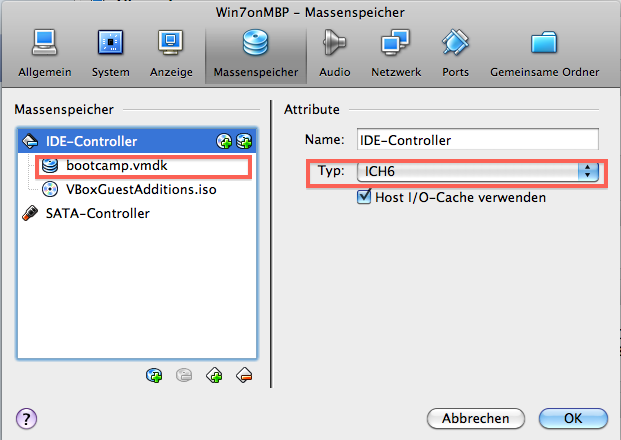
I strongly recommend to keep the SATA controller in the VM profile. This will have the SATA drivers automatically installed during your first boot.
First Boot and driver installation
So you’re now ready to boot your VM off the Boot Camp partition.
This will cetainly take a while as all the drivers need to be installed. Please take the chance to also install the VirtualBox guest additions.
Note: If you want 3D acceleration, you’ll need to install the VirtualBox drivers from safe mode (press F8 during boot to get into safe mode).
Optional: Re-attach boot drive to SATA controller
One of the most dramatic performance improvements for VirtualBox is the use of the virtual SATA controller in favor of the IDE controller.
So after you successfully installed all the drivers including the VirtualBox guest additions to your VM shut it down first. Then open your VM settings in VirtualBox and navigate to the storage controller section. Remove the hard drive from the IDE controller and re-attach it to the SATA controller. I asked you to keep it there in the first place so the drivers could be installed, remember?
During the next boot, Windows will automatically pick up the disk from the SATA controller and use this for booting.
As a result overall performance in VirtualBox will be a little snappier as with the IDE controller, which also used a bit more CPU power than the SATA controller.
So here’s finally our Windows 7 VM bootet off the Boot Camp partition. And yet, it’s still possible to run the very same Windows 7 natively by booting directly into Boot Camp.


August 26th, 2013 at 11:49 am
Great post! still works well with 2013 mbp and windows 8.
August 28th, 2013 at 11:04 pm
One thing i noticed in using this setup is that if i take snapshots using VirtualBox when i boot into the Windows partition that it seems to load only the first snapshot and not the latest as i was expecting (hoping).
Anyway for the moment i’ve had to remove my snapshots.
Any tips would be welcome?
September 8th, 2013 at 11:01 am
Interesting thing, I did never try snapshots on a shared bootcamp partition so far.
Maybe something that should be looked further into.
September 18th, 2013 at 3:00 pm
Hi, thanks for the great walkthrough btw, I’ve managed to get it all working on my MBA 2011 with Win 8, but I’ve just gotten a MBA 2013 and have been trying to do the same thing, but i keep getting the “No Bootable Medium” error. I’ve tried all the suggestions from this site and others but still, nothing works. Any ideas with regards to the problem?
Mine’s MBA 13″ 2013, Win 8 64 bit system on Boot Camp parition (tried booting directly from startup, it works)
– did the creating of vmdk raw and chown, added local.rc with necessary boot strap commands,
– tried booting with IDE and SATA on multiple configurations..
– tried reinstalling Virtual Box..
any help would be appreciated! thanks!
September 21st, 2013 at 2:38 am
okay i think i might have solved that by putting the .vmdk files in the home directory, but now i’m getting a “Fatal: int18: boot failure” error..
November 4th, 2013 at 1:50 pm
I have Windows7 installed in a Bootcamp partition from Mac OS X Maverick. I downloaded the latest version of VirtualBox 4.3.2.
Before configuring Virtual Box I prepared Mac OS X, unmounted Bootcamp drive ($sudo chmod 777 /dev/disk0s4).
Then configured Virtual Box for the first boot ($sudo VBoxManage internal commands createrawvmdk -rawdisk /dev/disk0 -filename win7raw.vmdk -partitions 4). The two files “win7raw.vmdk” and “win7raw-pt.vmdk” were successfully created.
However when I open Virtual Box, go to “new”, select “use an existing virtual hard drive file” and then browse to the “win7raw.vmdk” file and want to open it, the following error occurs:
Failed to open the hard disk file /Users/flohy/win7raw.vmdk.
Permission problem accessing the file for the medium ‘/Users/flohy/win7raw.vmdk’ (VERR_ACCESS_DENIED).
Result Code: VBOX_E_FILE_ERROR (0x80BB0004)
Component: Medium
Interface: IMedium {05f2bbb6-a3a6-4fb9-9b49-6d0dda7142ac}
Callee: IVirtualBox {fafa4e17-1ee2-4905-a10e-fe7c18bf5554}
Callee RC: VBOX_E_OBJECT_NOT_FOUND (0x80BB0001)
I am really grateful for your help.
November 17th, 2013 at 9:54 pm
Just Save the below code as “Install.command” and double click on it to create BOOTCAMP image for VirtualBox
Note: Please check your disk identifier
#!/bin/bash
# Create folder in home directory
mkdir “VirtualBox VMs”
cd “VirtualBox VMs”
mkdir Win7onMBP
cd Win7onMBP
# BEFORE YOU DO ANYTHING FURTHER CHECK THE DISK IDENTIFIER FOR BOOTCAMP PARTITION
# AND EDIT THE FOLLOWING CODE
## TO CHECK THE BOOTCAMP DISK IDENTIFIER GO OPEN “DISK UTILITY” FROM APPLICATION
## SELECT BOOTCAMP FROM LEFT PANEL AND THEN CLICK ON “INFO” ICON
## NOW YOU WILL SEE A WINDOW WHICH CONTAINS DISK IDENTIFIER FOR BOOTCAMP PARTITION
# Set the permissions for the BOOTCAMP partition
sudo chmod 777 /dev/disk0s4
# Unmount the BOOTCAMP partition
diskutil umount /Volumes/BOOTCAMP
# Create the image file for VirtualBox
#NOTE: CHANGE THE PARTITION NUMBER ACCORDING TO THE BOOTCAMP DISK IDENTIFIER
sudo VBoxManage internalcommands createrawvmdk -rawdisk /dev/disk0 -filename win7raw.vmdk -partitions 4
## When This will run you will observe the following output
# Volume BOOTCAMP on disk0s4 unmounted
# RAW host disk access VMDK file win7raw.vmdk created successfully.
# [Process completed]
November 17th, 2013 at 9:59 pm
Save the following code as “Run-before-VirtialBox.command” and run it by double clicking it every time you want to run BOOTCAMP partition using VirtualBox
#!/bin/bash
# Run this script before you Start BOOTCAMP using VirtualBox
# ***** Note: Please check the Disk Identifier of the BOOTCAMP partition *****
## TO CHECK THE BOOTCAMP DISK IDENTIFIER GO OPEN “DISK UTILITY” FROM APPLICATION
## SELECT BOOTCAMP FROM LEFT PANEL AND THEN CLICK ON “INFO” ICON
## NOW YOU WILL SEE A WINDOW WHICH CONTAINS DISK IDENTIFIER FOR BOOTCAMP PARTITION
# grant VirtualBox permissions to Boot Camp partition
#
chmod 777 /dev/disk0s4
diskutil umount /Volumes/BOOTCAMP
# Thanks,
# Amit